04_车道线识别–计算机视觉基础知识与Canny 算法
车道线检测已经完成了吗?
前几个章节我们最终在图像上画出了车道线,那我们对车道线的检测工作就算完成了吗?是否可以用在实车上测试了呢?答案当然是否定的,由于现实世界中存在很多不确定性,例如光照变化,车道线颜色变化,我们采用的固定颜色阈值来检测车道线的办法在很多场景下不可用,我们需要更多的方法来检测,这是属于计算机视觉的范畴。
阅读更多

前几个章节我们最终在图像上画出了车道线,那我们对车道线的检测工作就算完成了吗?是否可以用在实车上测试了呢?答案当然是否定的,由于现实世界中存在很多不确定性,例如光照变化,车道线颜色变化,我们采用的固定颜色阈值来检测车道线的办法在很多场景下不可用,我们需要更多的方法来检测,这是属于计算机视觉的范畴。
阅读更多
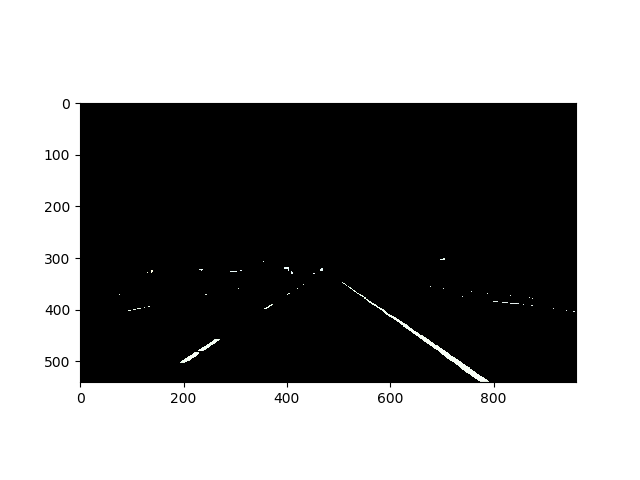
设想自动驾驶的摄像头固定在车辆前端,拍摄到的图像是固定大小的,例如:960*540;但是感兴趣的车道线不是分布在整个图像中的,而是正前方一小段区域。如果为了提取车道线,对整个图像都进行处理,一是加剧了计算单元的负担,二是没有任何收益。所以我们要让计算机只处理“有效的区域”
图像是人类进行驾驶时最重要的感知输入,对计算机而言,图像是一些数字的集合,如何让计算机像人类一样去感知图像是自动驾驶的一大关键点。本文将从最基础的图像基础,通过挑选色彩来识别车道线,让大家感受一下图像处理的基本知识。
launch文件可以看作是给roslaunch指令的一个输入,用于告诉这个指令应该启动哪些模块,模块之间如何连接。本文讲解如何使用ROS launch文件管理ROS启动。
wordpress的编辑功能实在是太烂了
测试markdown的功能
这是代码
#include<stdio.h>

int main(){

    while(true){

    }
}
这是图片
目前能够找到的比较好的就是WP Editor.md了
自带编辑器实在是太烂了太烂了太烂了
word2013上传还有个毛病,每次上传都会覆盖上一篇博客,气死了,而且代码显示一塌糊涂的
本文根据ROS官方Tutorial(http://wiki.ros.org/ROS/Tutorials)进行,希望系统学习和入门的小伙伴可以官网学习。本文的学习基于以下环境:
主机:Windows 10 x64
虚拟机:Ubuntu 16.04 LTS
ROS:kinetic(安装在虚拟机的Ubuntu上)
请注意:本文与上一篇博文的ROS安装位置不同,本文的ROS直接安装在虚拟机上,方便使用图形界面调试以及学习
sudo sh -c ‘echo “deb http://packages.ros.org/ros/ubuntu $(lsb_release -sc) main” > /etc/apt/sources.list.d/ros-latest.list’
以上指令将最新的ROS加入到sources.list文件里面,使得apt-get可以寻找到ROS及依赖的文件
sudo apt-key adv –keyserver hkp://ha.pool.sks-keyservers.net:80 –recv-key 421C365BD9FF1F717815A3895523BAEEB01FA116
sudo apt-get update
sudo apt-get install ros-kinetic-desktop-full
此安装指令包含了ROS,RQT,rviz,常规的库,2D/3D模拟器等,属于全量安装
sudo rosdep init
rosdep update
echo “source /opt/ros/kinetic/setup.bash” >> ~/.bashrc
source ~/.bashrc
这一步将ROS的环境变量设置写入到.bashrc里面,重启后会自动导入setup.bash的设置,免得每次重启都要设置一遍环境变量。
sudo apt-get install python-rosinstall python-rosinstall-generator python-wstool build-essential
$ printenv | grep ROS
以上指令用于确认安装时setup.bash中的内容是否生效,如输出内容为空,请确认上一节“设置环境变量”是否正确执行,如未正确执行请参考以下指令:
$ source /opt/ros/kinetic/setup.bash
$ mkdir -p ~/catkin_ws/src
$ cd ~/catkin_ws/
$ catkin_make
工作区内必先有一个src文件夹,在执行catkin_make之后catkin会自动生成build/devel两个文件夹,以及在src文件夹内生成CMakelist文件。
$ source devel/setup.bash
执行以下指令后可以看到你的工作区已经加入到ROS_PACKAGE_PATH环境变量中,即可确认该适配已生效
$ echo $ROS_PACKAGE_PATH
/home/youruser/catkin_ws/src:/opt/ros/kinetic/share
ROS基于Package管理所有文件
用法
$ rospack find [package_name]
寻找对应包信息,例子:
$ rospack find roscpp
显示:
/opt/ros/kinetic/share/roscpp
用法
$ roscd [locationname[/subdir]]
用法
$ rosls [locationname[/subdir]]
以上指令的好处是只要是ros内的包,只需要输入名称的前部分字幕,按tab键就能自动补全,免去了系统的cd/ls指令再去指定路径的麻烦
典型package结构如下:
my_package/
CMakeLists.txt
package.xml
典型的workspace结构如下:
workspace_folder/ — WORKSPACE
src/ — SOURCE SPACE
CMakeLists.txt — ‘Toplevel’ CMake file, provided by catkin
package_1/
CMakeLists.txt — CMakeLists.txt file for package_1
package.xml — Package manifest for package_1
…
package_n/
CMakeLists.txt — CMakeLists.txt file for package_n
package.xml — Package manifest for package_n
在之前创建的catkin_ws/src目录下执行:
$ catkin_create_pkg beginner_tutorials std_msgs rospy roscpp
以上参数:
$ cd ~/catkin_ws #回到workspace目录下
$ catkin_make
编译完成后记得更新你的环境变量
$ . ~/catkin_ws/devel/setup.bash
$ rospack depends1 beginner_tutorials
输出:
roscpp
rospy
std_msgs
正是上一小节创建package时指定的几个依赖package,这些信息我们也可以在beginner_tutorials目录下的package.xml中查找到:
$ roscd beginner_tutorials
$ cat package.xml
<package format=”2″>
…
<buildtool_depend>catkin</buildtool_depend>
<build_depend>roscpp</build_depend>
<build_depend>rospy</build_depend>
<build_depend>std_msgs</build_depend>
…
</package>
每个包还有自己依赖的包,如此形成了一个庞大的依赖关系,想查找所有以来关系可以使用如下指令:
$ rospack depends beginner_tutorials
cpp_common
rostime
roscpp_traits
roscpp_serialization
catkin
genmsg
genpy
message_runtime
gencpp
geneus
gennodejs
genlisp
message_generation
rosbuild
rosconsole
std_msgs
rosgraph_msgs
xmlrpcpp
roscpp
rosgraph
ros_environment
rospack
roslib
rospy
注意:depends1和depends的区别
node可以看作是package内的一个可执行文件,节点使用ROS的客户端库与其他节点通信,node可以向Topic发布或订阅消息,同时node可以作为一个service或者提供service。
ROS 允许使用不同的编程语言编写客户端
roscore是运行ROS的第一步,是整个系统运行起来的核心
在第一个终端运行
$ roscore
输出如下:
… logging to ~/.ros/log/9cf88ce4-b14d-11df-8a75-00251148e8cf/roslaunch-machine_name-13039.log
Checking log directory for disk usage. This may take awhile.
Press Ctrl-C to interrupt
Done checking log file disk usage. Usage is <1GB.
started roslaunch server http://machine_name:33919/
ros_comm version 1.4.7
SUMMARY
======
PARAMETERS
* /rosversion
* /rosdistro
NODES
auto-starting new master
process[master]: started with pid [13054]
ROS_MASTER_URI=http://machine_name:11311/
setting /run_id to 9cf88ce4-b14d-11df-8a75-00251148e8cf
process[rosout-1]: started with pid [13067]
started core service [/rosout]
保持终端不关闭,持续运行
开一个新的终端,注意确保所有的环境变量都是生效的,rosnode指令可以显示当前正在运行的节点信息:
$ rosnode list
可以看到输出:
/rosout
显示当前只有一个rosout节点正在运行,使用rosnode info查看相关节点的信息
$ rosnode info /rosout
————————————————————————
Node [/rosout]
Publications:
* /rosout_agg [rosgraph_msgs/Log]
Subscriptions:
* /rosout [unknown type]
Services:
* /rosout/get_loggers
* /rosout/set_logger_level
contacting node http://machine_name:54614/ …
Pid: 5092
用法:
$ rosrun [package_name] [node_name]
实践:开一个新的终端,运行:
$ rosrun turtlesim turtlesim_node
可以看到turtlesim节点出现:

再新开一个终端,运行:
$ rosnode list
此时你会发现除了rosout之外还有一个节点正在运行:
/rosout
/turtlesim
rosrun可以针对每一个运行的节点设置名称:
$ rosrun turtlesim turtlesim_node __name:=my_turtle
此时在rosnode list的终端中再次运行rosnode list会得到如下结果:
/my_turtle
/rosout
$ rosnode ping my_turtle
rosnode: node is [/my_turtle]
pinging /my_turtle with a timeout of 3.0s
xmlrpc reply from http://aqy:42235/ time=1.152992ms
xmlrpc reply from http://aqy:42235/ time=1.120090ms
xmlrpc reply from http://aqy:42235/ time=1.700878ms
xmlrpc reply from http://aqy:42235/ time=1.127958ms
上一节运行了turtlesim节点之后画面上的小乌龟还无法移动,因为该节点没有指令输入,此时我们再启动一个终端,启动一个接收键盘指令的node:
$ rosrun turtlesim turtle_teleop_key
[ INFO] 1254264546.878445000: Started node [/teleop_turtle], pid [5528], bound on [aqy], xmlrpc port [43918], tcpros port [55936], logging to [~/ros/ros/log/teleop_turtle_5528.log], using [real] time
Reading from keyboard
—————————
Use arrow keys to move the turtle.
此时在接收指令的终端中按按键上下左右,小乌龟就会移动了

这个过程又是如何传递的呢?请往下看:
上面的turtlesim_node和turtle_teleop_key两个节点指点是用过ROS Topic来连接并通信的,turtle_teleop_key在topics中发布一个指令,同时turtlesim_node又订阅该类型的指令,于是整个信息传递链路就打通了,我们可以同个一个图形界面更直观观察这个过程。
rqt_graph创建一个动态的图形表征当前系统中不同节点之间的topic,启动一个新终端,运行:
$ rosrun rqt_graph rqt_graph
你会发现有如下画面:

借用老图,新的版本中间传递的不是“command_velocity”,而是“command_vel”
$ rostopic -h
rostopic bw display bandwidth used by topic
rostopic echo print messages to screen
rostopic hz display publishing rate of topic
rostopic list print information about active topics
rostopic pub publish data to topic
rostopic type print topic type
echo用于显示当前传递的信息流的详情,从上小节可以看出,当前两个节点之间传递的是/turtle1/cmd_vel类型的topic
$ rostopic echo /turtle1/cmd_vel
linear:
x: 2.0
y: 0.0
z: 0.0
angular:
x: 0.0
y: 0.0
z: 0.0
—
linear:
x: 2.0
y: 0.0
z: 0.0
angular:
x: 0.0
y: 0.0
z: 0.0
—
此时我们再次观察rqt_graph会发现/turtle1/cmd_vel的订阅者多了一个

这是由于我们使用了rostopic echo指令在观察,所以这个topic多了一个订阅者
开一个新的终端:
$ rostopic list -h
Usage: rostopic list [/topic]
Options:
-h, –help show this help message and exit
-b BAGFILE, –bag=BAGFILE
list topics in .bag file
-v, –verbose list full details about each topic
-p list only publishers
-s list only subscribers
$ rostopic list -v
Published topics:
* /turtle1/color_sensor [turtlesim/Color] 1 publisher
* /turtle1/cmd_vel [geometry_msgs/Twist] 1 publisher
* /rosout [rosgraph_msgs/Log] 2 publishers
* /rosout_agg [rosgraph_msgs/Log] 1 publisher
* /turtle1/pose [turtlesim/Pose] 1 publisher
Subscribed topics:
* /turtle1/cmd_vel [geometry_msgs/Twist] 1 subscriber
* /rosout [rosgraph_msgs/Log] 1 subscriber
topics上跑的信息是messages,查看topic的type属性可以知道该message的详情
Try:
$ rostopic type /turtle1/cmd_vel
geometry_msgs/Twist
We can look at the details of the message using rosmsg:
$ rosmsg show geometry_msgs/Twist
用法:
rostopic pub [topic] [msg_type] [args]
我们知道了message的名称以及message的结构,我们也可以手动发布一个message,这在调试过程中非常有用
$ rostopic pub -1 /turtle1/cmd_vel geometry_msgs/Twist — ‘[2.0, 0.0, 0.0]’ ‘[0.0, 0.0, 1.8]’
执行后我们可以发现,小乌龟走了一段弧线

这是因为我们手工发布的topic中指定了小乌龟的前进长度以及角度
由于我们的指令中加了一个“-1”的参数,该参数表明这条message只发送一次,而小乌龟每秒刷新一次行进参数,如果没有收到新的指令就不会做任何动作。想要让小乌龟一直行走,需要将“-1”参数替换成“-r”参数
$ rostopic pub /turtle1/cmd_vel geometry_msgs/Twist -r 1 — ‘[2.0, 0.0, 0.0]’ ‘[0.0, 0.0, -1.8]’

此时小乌龟就会一直画圆圈,我们再查看ros_graph可以发现

使用如下指令(开一个新终端)可以看到当前小乌龟的实时位置
rostopic echo /turtle1/pose
rostopic hz用于查看信息的发布频率,并进行一些统计
接上一小节,运行
$ rostopic hz /turtle1/pose
可以发现:
subscribed to [/turtle1/pose]
average rate: 59.354
min: 0.005s max: 0.027s std dev: 0.00284s window: 58
average rate: 59.459
min: 0.005s max: 0.027s std dev: 0.00271s window: 118
average rate: 59.539
min: 0.004s max: 0.030s std dev: 0.00339s window: 177
average rate: 59.492
min: 0.004s max: 0.030s std dev: 0.00380s window: 237
average rate: 59.463
min: 0.004s max: 0.030s std dev: 0.00380s window: 290
可以发现,乌龟位置的topic更新速度大概是60Hz
rqt_plot基于matplotlib
执行:
$ rosrun rqt_plot rqt_plot

在界面的topic中分别加入/turtle1/pose/x和/turtle1/pose/y即可看到这两个数据变化的曲线
ROS service是节点的另一种功能形式,可以让节点支持发送请求,接受响应数据
用法:
rosservice list print information about active services
rosservice call call the service with the provided args
rosservice type print service type
rosservice find find services by service type
rosservice uri print service ROSRPC uri
$ rosservice list
/clear
/kill
/reset
/rosout/get_loggers
/rosout/set_logger_level
/spawn
/teleop_turtle/get_loggers
/teleop_turtle/set_logger_level
/turtle1/set_pen
/turtle1/teleport_absolute
/turtle1/teleport_relative
/turtlesim/get_loggers
/turtlesim/set_logger_level
从返回数据上我们可以看出每个节点提供的服务
$ rosservice type /clear
返回:
std_srvs/Empty
说明clear服务不需要输入任何参数
$ rosservice call /clear
这时候我们发现小乌龟的轨迹全部被清除了
rosparam允许你在ROS的参数服务器上存储大量数据,且数据格式多用,使用YAML格式存储,非常方便
用法:
rosparam set set parameter
rosparam get get parameter
rosparam load load parameters from file
rosparam dump dump parameters to file
rosparam delete delete parameter
rosparam list list parameter names
$ rosparam list
Here we can see that the turtlesim node has three parameters on the param server for background color:
用法
rosparam set [param_name]
rosparam get [param_name]
实践:
$ rosparam set /background_r 150
$ rosservice call /clear
此时可以发现小乌龟的窗口背景色已改变

查看参数值:
$ rosparam get /background_r
返回:
150
可以同时查看全部参数:
$ rosparam get /
background_b: 255
background_g: 86
background_r: 150
roslaunch:
uris: {‘aqy:51932’: ‘http://aqy:51932/’}
run_id: e07ea71e-98df-11de-8875-001b21201aa8
Usage:
rosparam dump [file_name] [namespace]
rosparam load [file_name] [namespace]
Here we write all the parameters to the file params.yaml
$ rosparam dump params.yaml
You can even load these yaml files into new namespaces, e.g. copy:
$ rosparam load params.yaml copy
$ rosparam get /copy/background_b
255
sudo apt-get install ros- kinetic -rqt ros- kinetic -rqt-common-plugins ros- kinetic -turtlesim
rqt_console与ROS的日志框架相结合,用于显示分层级显示日志信息;rqt_logger_level用于设置显示的日志层级(DEBUG, WARN, INFO, and ERROR)
运行:
$ rosrun rqt_console rqt_console
$ rosrun rqt_logger_level rqt_logger_level


在新的终端中执行:
$ rosrun turtlesim turtlesim_node
可以在rqt_console窗口中看到相关的info信息

在rqt_logger_level中将信息层级设置为warn

同时控制小乌龟撞墙
rostopic pub /turtle1/cmd_vel geometry_msgs/Twist -r 1 — ‘{linear: {x: 2.0, y: 0.0, z: 0.0}, angular: {x: 0.0,y: 0.0,z: 0.0}}’
此时可以看到出现很多告警信息

最近想玩玩智能小车,就想在吃灰已久的Microzed上面运行ROS以实现一些比较好玩的功能。第一个拦路虎就是如何把ROS移植到系统上面。Microzed目前支持比较好的Linux系统是Linaro,而ROS官方的Ubuntu ARM install of ROS Indigo(http://wiki.ros.org/indigo/Installation/UbuntuARM)并不合适,试了很多次,踩了很多坑始终无法解决依赖。本文记录一下踩过的坑,方便以后查看。
You may already know, Enfold is one of the most popular, most loved and highly rated theme. It’s packed with user-friendly features, beautiful designs and it is deeply integrated with commonly used third party services like WooCommerce, WPML, MailChimp, Events Calendar and other popular plugins.
Enfold comes with a wide range of ready to use demos and help you easily setup a shop, business site, personal blog, portfolio, agency, travel website and a lot more. Assuming you have already installed WordPress let’s take a look at installing enfold, importing demos and keeping it secure and up to date.
If you are installing a theme, plug-in or modifying any files belonging to your existing website on which you have invested time, money and effort. It’s important to backup your website and save yourself the effort of setting up the site again from scratch if anything goes wrong.
The WordPress Codex has useful info about WordPress site backups.
Some plugins make it easy to take backups:
Enfold uses custom fields to store the template builder data. it’s really easy to add these fields to the export/import file using a plugin like WP Import/Export All
Export:
Import:
That’s it – you successfully exported/imported your entries including the Enfold template builder data.
Straight uploading the downloaded package with all files and documentation to WordPress will display an error. This is because the package contains extra files and format that is not recognised by WordPress. Unpack the downloaded package and upload only the enfold folder with the theme files or just download the Installable WordPress file to upload via WordPress dashboard.
To re-install enfold theme via the WordPress dashboard without losing data.
To understand FTP think of it as a folder with a lot of sub-folders just like it is on your local system.
Worried about losing data when re-installing the theme via FTP?
Well, do not worry the pages and posts you have created will be safe in WordPress database and we are not going to make any changes to the data.
If you don’t have an FTP client you can also do this using the File Manager available in your hosting control panel.
Re-installing the theme is nothing complicated it is same as deleting a folder on your desktop and re-creating a new one 🙂 Just access WordPress directory on your server and go to folder “wp-content/themes” delete “enfold” folder and upload the fresh copy of the theme files downloaded from ThemeForest.
Fusce dapibus, tellus ac cursus commodo, tortor mauris condimentum nibh, ut fermentum massa justo sit amet risus. Etiam porta sem malesuada magna mollis euismod. Donec sed odio dui. Duis mollis, est non commodo luctus, nisi erat porttitor ligula, eget lacinia odio sem nec elit. Aenean eu leo quam. Pellentesque ornare sem lacinia quam venenatis vestibulum. Nullam id dolor id nibh ultricies vehicula ut id elit. Aenean lacinia bibendum nulla sed consectetur. Cras justo odio, dapibus ac facilisis in, egestas eget quam. Praesent commodo cursus magna, vel scelerisque nisl consectetur et.
Maecenas sed diam eget risus varius blandit sit amet non magna. Lorem ipsum dolor sit amet, consectetur adipiscing elit. Lorem ipsum dolor sit amet, consectetur adipiscing elit. Praesent commodo cursus magna, vel scelerisque nisl consectetur et. Praesent commodo cursus magna, vel scelerisque nisl consectetur et. Maecenas sed diam eget risus varius blandit sit amet non magna. Vestibulum id ligula porta felis euismod semper. Aenean eu leo quam. Pellentesque ornare sem lacinia quam venenatis vestibulum. Vestibulum id ligula porta felis euismod semper. Nulla vitae elit libero, a pharetra augue. Vivamus sagittis lacus vel augue laoreet rutrum faucibus dolor auctor.
Praesent commodo cursus magna, vel scelerisque nisl consectetur et. Donec id elit non mi porta gravida at eget metus. Donec sed odio dui. Sed posuere consectetur est at lobortis. Praesent commodo cursus magna, vel scelerisque nisl consectetur et. Etiam porta sem malesuada magna mollis euismod. Maecenas sed diam eget risus varius blandit sit amet non magna. Curabitur blandit tempus porttitor. Vestibulum id ligula porta felis euismod semper. Duis mollis, est non commodo luctus, nisi erat porttitor ligula, eget lacinia odio sem nec elit. Vestibulum id ligula porta felis euismod semper.
Cum sociis natoque penatibus et magnis dis parturient montes, nascetur ridiculus mus. Etiam porta sem malesuada magna mollis euismod. Vivamus sagittis lacus vel augue laoreet rutrum faucibus dolor auctor. Cras justo odio, dapibus ac facilisis in, egestas eget quam. Duis mollis, est non commodo luctus, nisi erat porttitor ligula, eget lacinia odio sem nec elit. Aenean eu leo quam. Pellentesque ornare sem lacinia quam venenatis vestibulum. Vivamus sagittis lacus vel augue laoreet rutrum faucibus dolor auctor.
Donec id elit non mi porta gravida at eget metus. Aenean eu leo quam. Pellentesque ornare sem lacinia quam venenatis vestibulum. Donec id elit non mi porta gravida at eget metus. Vestibulum id ligula porta felis euismod semper. Nullam quis risus eget urna mollis ornare vel eu leo. Cum sociis natoque penatibus et magnis dis parturient montes, nascetur ridiculus mus. Sed posuere consectetur est at lobortis. Morbi leo risus, porta ac consectetur ac, vestibulum at eros. Donec id elit non mi porta gravida at eget metus.