
3-01 TensorFlow入门-Hello World
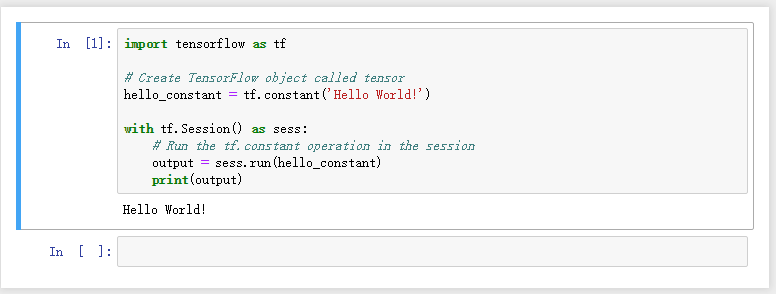
上节我们使用了一个hello world的示例来测试TensorFlow是否正确安装,现在我们来看一看这一段代码究竟做了什么。
import tensorflow as tf

# Create TensorFlow object called hello_constant
hello_constant = tf.constant('Hello World!')

with tf.Session() as sess:
    # Run the tf.constant operation in the session
    output = sess.run(hello_constant)
    print(output)
Tensor 张量
在TensorFlow中,数据并不是存储为整数、浮点数、或者字符串。这些数据都被封装在称为Tensor的对象中,中文叫张量。这段代码:
hello_constant = tf.constant('Hello World!')
hello_constant是一个0维的字符串Tensor。关于Tensor的维度可以从以下的例子中看出:
# A is a 0-dimensional int32 tensor
A = tf.constant(1234)
# B is a 1-dimensional int32 tensor
B = tf.constant([123,456,789])
 # C is a 2-dimensional int32 tensor
C = tf.constant([ [123,456,789], [222,333,444] ])
tf.constant()操作返回的是常数类型的Tensor,这种类型的Tensor的值永远不会被改变。
Session
TensorFlow的API是围绕着计算图的思想进行构建的。我们在上一章节的创建MiniFlow中已经了解到计算图是一种可视化数学过程的方法。我们把我们的hello world代码转换为图:
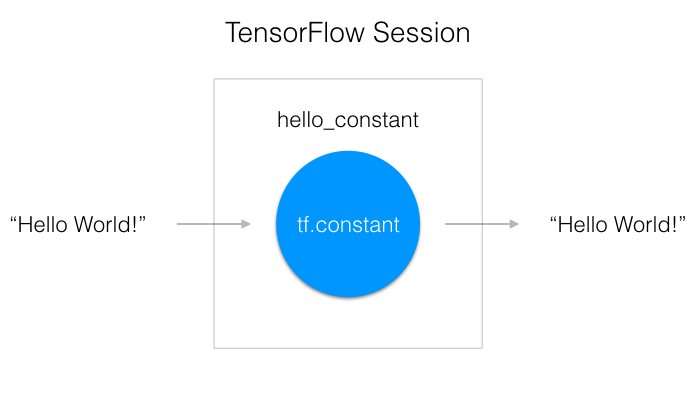
TensorFlow Session是一个运行图的环境,如上图所示。这个session负责将操作分配给GPU或CPU,以下是如何使用这个session:
with tf.Session() as sess:
    output = sess.run(hello_constant)
这段代码通过tf.Session()创建了一个session的实例:sess.
sess.run() 方法运行Tensor并返回结果。
Input输入
在上面的代码中我们输入一个Tensor到session中并返回了结果。那如果我们想使用一个非常数的Tensor呢?这就需要用到tf.placeholder() 和 feed_dict 方法了。
tf.placeholder()
一般来说我们不能直接把x数据集直接输入到TensorFlow,因为TensorFlow是一个通用的框架,必须要适应不同的输入类型,不同的参数,所以设计了一个tf.placeholder()方法。
tf.placeholder()返回一个Tensor,该Tensor从传递给tf.session.run () 函数的数据中获取到值,允许我们在session运行之前设置好输入。
Session的输入字典feed_dict
x = tf.placeholder(tf.string)

with tf.Session() as sess:
    output = sess.run(x, feed_dict={x: 'Hello World'})
在tf.session.run ()函数中使用feed_dict参数来设置placeholder。以上代码表示x的值被设置为字符串”Hello, world”,当然我们也可以设置更多的数据:
x = tf.placeholder(tf.string)
y = tf.placeholder(tf.int32)
z = tf.placeholder(tf.float32)

with tf.Session() as sess:
    output = sess.run(x, feed_dict={x: 'Test String', y: 123, z: 45.67})
注意:如果从feed_dict传输的数据不满足Tensor的数据类型,我们会得到一个报错:“ValueError: invalid literal for…
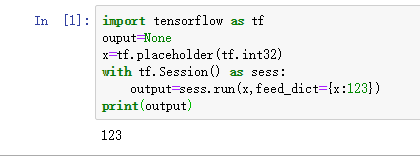
示例代码:
import tensorflow as tf
ouput=None
x=tf.placeholder(tf.int32)
with tf.Session() as sess:
    output=sess.run(x,feed_dict={x:123})
print(output)
TensorFlow计算
我们搞定了输入,现在我们来搞定使用方法,我们使用最基础的数学计算来看看Tensor是怎么实现加减乘除的。
加
x = tf.add(5, 2) # 7
tf.add()函数输入两个数,或者两个Tensor或者一个数一个Tensor,然后执行加法,返回带有结果的Tensor对象。
乘法与减法
x = tf.subtract(10, 4) # 6
y = tf.multiply(2, 5)  # 10
类型转换
有时为了计算必须用到类型转换,大家可以在notebook中测试一下
tf.subtract(tf.constant(2.0),tf.constant(1))
这段代码会返回一个错误
# Fails with ValueError: Tensor conversion requested dtype float32 for Tensor with dtype int32:
因为常数1是int类型的,而常数2.0是一个float类型的,TensorFlow并不会自动转换类型。为了应对这种状况,我们可以通过tf.cast()来转换数据类型
tf.subtract(tf.cast(tf.constant(2.0), tf.int32), tf.constant(1)) # 1
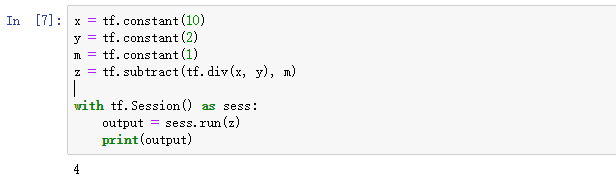
测试以下代码:
x = tf.constant(10)
y = tf.constant(2)
m = tf.constant(1)
z = tf.subtract(tf.div(x, y), m)

with tf.Session() as sess:
    output = sess.run(z)
    print(output)
发表评论
Want to join the discussion?Feel free to contribute!